Don't have the time to Read?
Watch this video instead.
Installation Guide
The installation process of Geo-Scatter can be intimidating for Blender beginners, as you'll need to know how to install a Blender plugin, and how to install a Blender asset library! You should already know about these steps, if not, watch this video! In short, if you want to use the biomes, after installing the .scatpack in your preferences, you'll need to also install the asset in your library because the Geo-Scatter will search for objects in there!
Plugins Drag and Drop
In the video we install a plugin manually on old Blender versions; however, in newer versions of Blender, you can now install plugins simply by dragging and dropping their .zip file directly in Blender.
Get your Copy
How to claim the latest available copy of your acquired product.
Claim your copy
You just got your hands on your very own copy of Geo-Scatter via our authorized redistributors listed on
the download page.
Congratulations, and thank you! Your financial support is directly helping us to improve this product, this project wouldn't exist without you!
If you'd like to download the product you just acquired, in order to update to the latest available version for example, please follow the instructions below.
Do you have access to the latest update?
Well, Yes! All customers have access to the latest update of their acquired product. However, as
explained in the FAQ, note that we do not promise free updates forever.
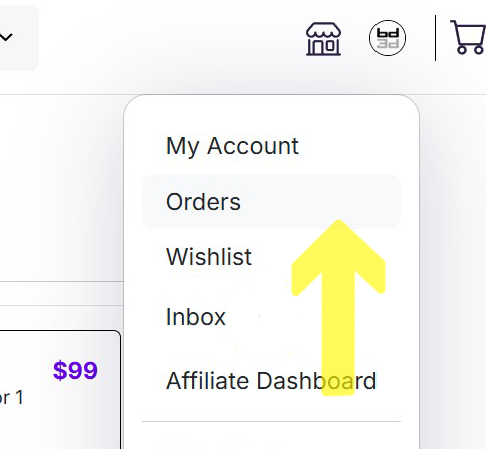
Superhive Download
Did you make your purchase via the Blendermarket? If it is the case, please read this article. In Short, login to your account, and click on the 'orders' button in the drop down menu. You'll find all your purchases there!
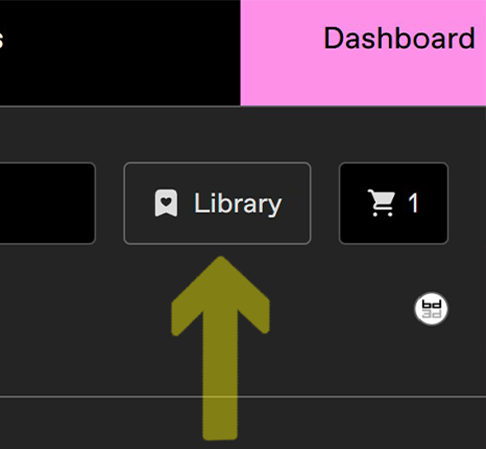
Gumroad Download
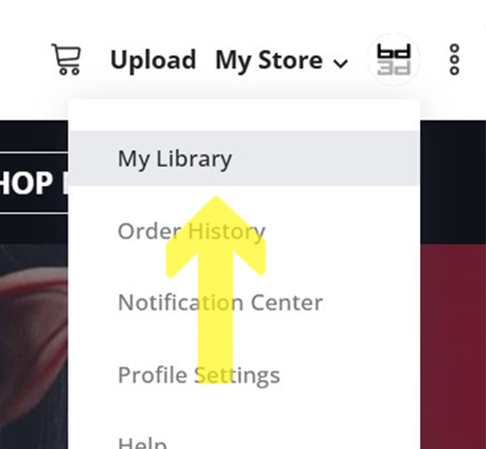
Or perhaps you made your purchase via the Gumroad platform? Login, then click on the Large library button to access all your purchases.
FlippedNormals Download
Did you purchase our product via the FlippedNormals Marketplace? Unfortunately this marketplace is no longer available. Please send us your FN invoice and we'll find a solution for you.
Plugin Installation
If you never installed a Blender addon before, here are the steps to follow.
Install your Plugin
-
Ensure your plugin version is compatible with the Blender version you are using.
Compatibility details can be found on the changelog page. -
Re-installation: If you already have a previous version of Geo-Scatter or Biome-Reader installed on your Blender version, please first uninstall these versions, restart Blender, and proceed to follow the following installation steps. Please note that Biome-Reader and Geo-Scatter cannot be installed simultaneously.
-
If you have Blender 4.2 or above and you're using Geo-Scatter 5.5 or above:
You can drag and drop the plugin .zip file directly into your Blender window. Blender will then prompt you to install and activate it the plugin. The plugin will wait for you in the 'T' panel of your 3Dviewport. You can also access the plugin manager interface in your blender addon preferences, search on 'Geo-Scatter' and click on 'Enter Manager'.
If you prefer manual installation, follow these steps: -
Open Blender Preferences by selecting Main Header > Edit > Preferences or by setting an editor type to 'Preferences'.
-
In the 'Add-ons' category, click on 'Install' (it may be in a menu hidden under an arrow button).
-
Select the 'GeoScatter.zip' file and confirm. Blender will extract the plugin .zip content to the following path:
WinOS: C:\Users\%USERNAME%\Appdata\Roaming\Blender Foundation\Blender\X.X\extensions\user_default\
macOS: /Users/$USER/Library/Application Support/Blender/X.X/extensions/user_default/
Linux: /home/$USER/.config/blender/X.X/extensions/user_default/
It may be useful to know about these paths for troubleshootings (consult the Blender manual for other OS paths). A total manual installation consists of unzipping your plugin content on such location by yourself.
If you are using an older Blender version, you will need to use the legacy plugin paths instead (before the extension platform was introduced):
WinOs: C:\Users\%USERNAME%\Appdata\Roaming\Blender Foundation\Blender\X.X\scripts\addons\
macOS: /Users/$USER/Library/Application Support/Blender/X.X/scripts/addons/
Linux: /home/$USER/.config/blender/X.X/scripts/addons/
-
In Blender's Add-ons preferences, search and enable Geo-Scatter. Click the arrow next to 'Enable' to access plugin settings.
-
Save your preferences to retain changes (it should be done automatically by default).
-
For first-time users, you may want to also install your first biome.scatpack and preset.scatpacks!
Installing a Scatpack
Scatpack files are archives containing Biomes or Presets.
Installing a Scatpack
-
What is a scatpack to begin with! A scatpack is simply an archive file that will unzip and add content to your Geo-Scatter plugin. It can contain presets for the scatter preset operator (or other presets for various menus), it can contain image textures for the patterin features, and most importantly it can contains biomes for the biome-scatter feature. All this content will be extracted in what we called your 'Scatter library'. (More information about this library in 'Manage your Scatter-library just below')
-
First of all, do you have a .scatpack file to begin with? If you never used our plugin before, you can get biomes scatpacks right here! We made some available for free for you as well!
-
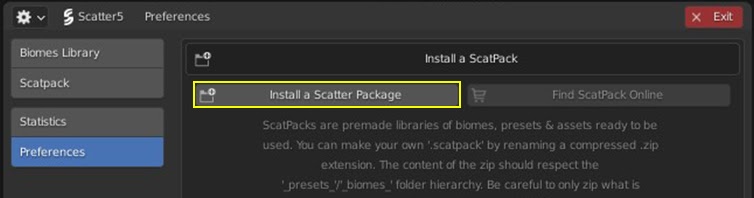
To install a scatpack, go into our plugin manager interface (Either by going in the Scatter N panel > Creation > Biome Scatter or by going into your Blender preferences editor and searching for our plugin, and open our plugin manager interface).
-
Then in the preferences section, you will have the ability to install a .scatpack file, click on the "Install a Scatter Package" operator, and select your file in the file selector window, confirm.
-
Once a package has been installed, you will be able to refresh your library to see the new elements available. Depending on your package you may see a new category in your library navigator, located in the left side panel. (You can refresh the biome library in your biome library editor header).
-
When you install a scatpack containing a biome, there's two possibilities: Either your pack contained a .blend file, then no further action is needed as the biome system will use this .blend file for scattering the biome. Or, most commonly, your biome pack does not contain any .blend file, and you most likely need to add a new asset-library in your blender asset browser editor!
-
Please note that if you installed a scatpack named preset.scatpack, it is not a biome, it is a pack of presets for the preset-scatter operator located in the 'Tweak' panel.
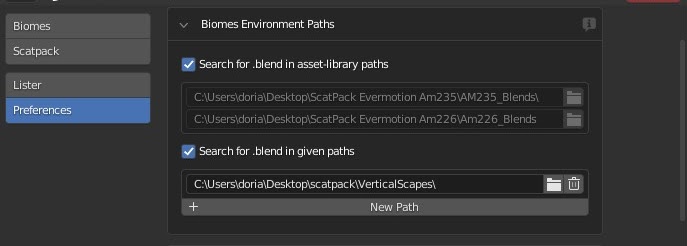
Define Environment Paths
-
Remember, a biome file combines a scattering preset with a 3d-object coming from a .blend file.
When you scatter a biome, the plugin will search everywhere in your biome library for the .blend file it needs, if not found, it will search in your Blender asset-browser library, if not found again, it will search in the custom paths you can define! -
In short, if the partner does not include a .blend in his scatpack, you will need to install your assets in your Blender asset browser, or define a new environment path that leads to this library of objects.
Asset Browser Support
If you are new to Blender, here is how you can install any asset library!
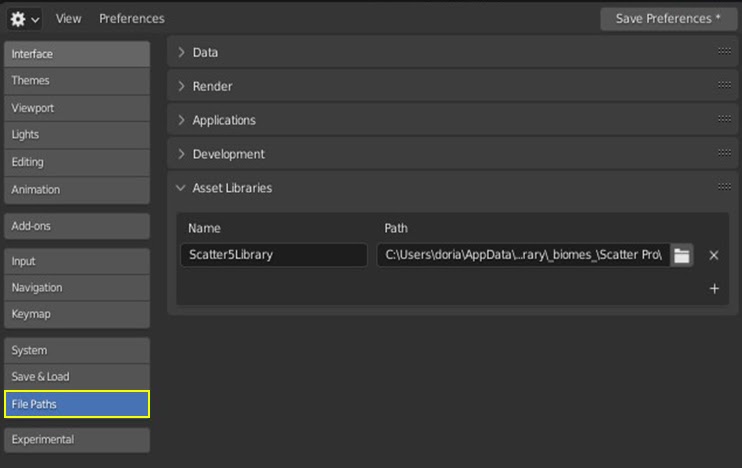
Add an asset library in Blender
-
In Blender, Go in Preferences Editor > Filepaths > Asset libraries & Add this path to your asset libraries, a new library will be available in your asset browser editor, and you'll be able to select it from the left menu drop down properties.
- We strongly recommend installing your assets as an asset-browser library, because our biome system will search there for the assets it might need!
Manage your Scatter-Library
Here's how to access youe scatter-library.
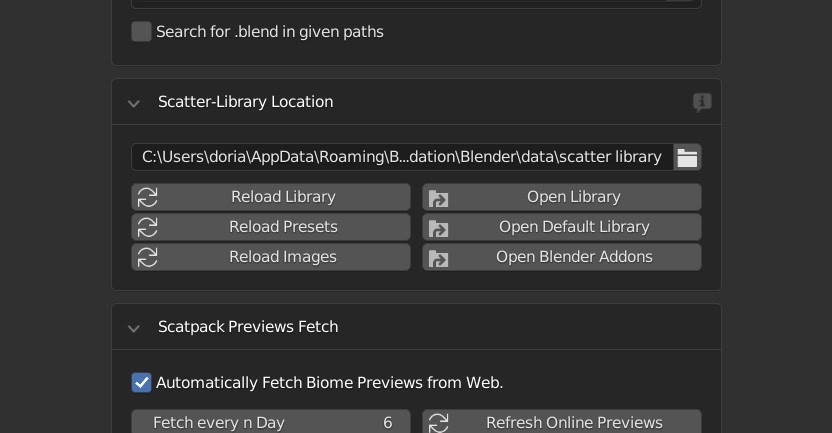
Find your Scatter-Library
When you install a .scatpack file, the plugin will unzip its content ( .biome , .preset , .jpeg , or .blend files ) to your scatter library folder located somewhere on your computer. By default, it will be located in C:\Users\%USERNAME%\Appdata\Roaming\Blender Foundation\Blender\data\scatter library\ for windows OS, however this location can be customized. You are able to directly open the scatter library folder in your file explorer at the correct location with an operator also located in your Geo-Scatter plugin preferences.
What's in your Scatter-Library ?
This library is yours to manage, the Geo-Scatter plugin will not remove files from your library automatically. There are multiple sub-folders in this library, all folders are used by our plugin. Find hereby an explanation of each folder:
-
_biomes_ folder. This folder will contain all files related to your biomes, being .jpeg , .biome , .preset and potentially .blend if not stored in external locations. You are free to re-arrange the biomes category structure as the biome library interface will dynamically re-build itself depending on your library folder structure, just hit the refresh button afterward.
-
_presets_ folder. This folder will contain all the .preset text files, used by the scatter-preset operator. These files are accompanied by their .jpeg icons.
-
_bitmaps_ is a library of images accessible from the scatter-patterns interface. Feel free to add your own images that might be useful for creating interesting scattering patterns if you wish to.
-
_market_ is for the gallery of scatpack previews, fetched from the web. The _possessions_ is used to display a checkmark on the scatpack possessed by the user.
Relocate your Scatter-Library:
You can redefine your library path in the plugin manager.
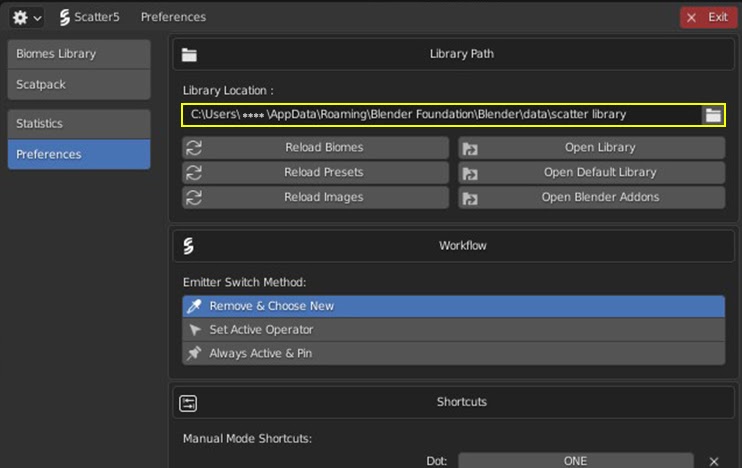
Relocate the Library
-
In your Geo-Scatter manager preferences, choose a new correct library path.
-
Save preferences, and restart Blender.
Installation Troubleshooting
Have installation issues? Please read these Tips.
Common MacOS issues
If you can't install your plugin on your MacOS that's most likely because your safari browser automatically unzipped the downloaded .zip file, then you tried to re-zip the content manually. However, now the folder structure has changed, therefore Blender is not recognizing the plugin (A Blender plugin is either a folder containing directly a __init__.py file, or a single .py file). The large majority of installation error reports Blender plugin developers receive from MacOS customers come from these issues. To resolve it, we'd suggest learning how to download a .zip file within your web browser without automatically unzipping the download, otherwise, you won't be able to install most Blender addons.
Compatibility Issues
The vast majority of users reporting installation issues are from users using an unsupported version of Blender with our plugin. Please read about our plugin compatibility information on the changelogs page. Because Blender changes very quickly, you'll need to expect older plugins to break rather quickly. It is very important to respect the compatibility instructions of the plugin you are downloading, never assume that a plugin is compatible with any version of Blender, this is a False assumption.
Clean Environment
If you are encountering errors with our plugin, we might ask you to test our plugin on a clean installation of Blender, with no other plugins enabled!
Here's how you can create your own portable virgin
installation of Blender:
- On the official Blender website, download your Blender release as a .zip
- Unpack the .zip somewhere on your computer, the desktop for example.
-
Now we will make your installation portable. Please navigate in the unpacked folder, where should see a blender.exe file.
- If you are using blender 4.2 or newer: Add a new empty folder named portable right next to blender.exe.
- If you are blender 4.1 or older: Navigate to the *version number* folder, and add a new empty folder called config.
- Run the file called blender.exe to start your portable version. It will be a clean environment to test your issues. Normally none of your plugins shall be installed anymore.
- Install our plugin and see if the issue persists.
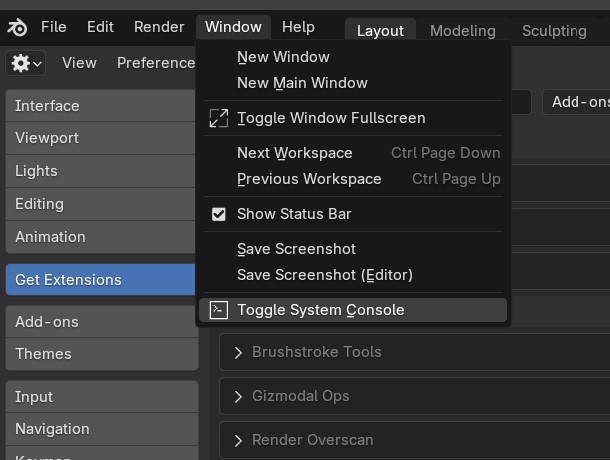
Accessing the Console for Error Messages
If you encounter issues while using the Geo-Scatter plugin, viewing the console window can provide helpful error messages for us.
Here’s how to open it on both Windows and macOS:
WindowsOS
- 1. Open Blender.
- 2. Go to the top menu and select Window > Toggle System Console.
- 3. A console window will open, displaying error messages and debugging information that can help in diagnosing issues.
Starting Blender in Debug Mode
Running Blender in debug mode can provide detailed error messages, helping diagnose issues effectively, even in cases where Blender completely crashes. Here’s how to enable debug mode by opening Blender directly from the console:
WindowsOS
- 1. Open the Command Prompt by pressing Win + R, typing cmd, and pressing Enter.
- 2. In the Command Prompt, we’ll use cd to navigate to the folder where Blender’s executable (.exe) file is located.
- About cd: The cd command stands for "change directory." It allows you to move to a specified folder on your computer. For example, you can type:
cd "C:\Program Files\Blender Foundation\Blender"
This navigates directly to Blender’s installation folder if it’s installed at that path. - Changing drives: If Blender is installed on a different drive (e.g., D:), first type the drive letter followed by a colon (e.g., D:), then press Enter to switch to that drive. After that, use cd as usual to navigate to Blender’s folder.
- Step-by-step navigation: You can also navigate step-by-step by typing cd followed by each folder name, like this:
cd "C:\Program Files"
then
cd "Blender Foundation\Blender"
- Going one directory down: At any time, you can type cd .. to move down directories.
- About cd: The cd command stands for "change directory." It allows you to move to a specified folder on your computer. For example, you can type:
- 3. Once in the Blender folder, run Blender in debug mode by typing:
blender --debug - 4. This will start Blender, and the Command Prompt will display detailed debugging information. If Blender crashes, the error messages will remain visible in the Command Prompt window.
MacOS
- 1. Open Terminal from your Applications > Utilities folder.
- 2. In Terminal, type open -a Blender --args --debug and press Enter. This command starts Blender in debug mode, with the console output visible in Terminal.
- 3. If Blender crashes, error messages will remain visible in Terminal, allowing for easier troubleshooting.
Starting Blender in debug mode through the console helps capture any crash-related error messages, making it easier to provide detailed logs for support or troubleshoot persistent issues.