Introduction
Introduction to manual distribution mode
The Idea of Manual Mode
Geo-Scatter manual mode was born out of a simple idea: We wanted to create an alternative distribution workflow for artists who do not necessarily need a fully procedural solution, but would rather want a more direct, "physical" approach.
In Manual mode, you are painting instances like you would when painting a landscape on a canvas, with a set of various brushes to choose from, that will add, alter or remove matter.
Generating the Points
Unlike all other distribution methods, manual mode will not generate
points with the help of an algorithm, instead, the points are directly
encoded within a newly created mesh. Painting with a manual distribution
brush will define new points in space, with specific rotation, scale, and
instance attributes.
Once the points are defined and encoded, they will be processed in the
scatter engine.

Graphic Tablet Support
As the main goal of this mode is emulating a painting workflow, graphic tablet support was a matter of course.
Therefore, for most brushes, you will find options in the header that enable pen pressure sensitivity for scale/density/radius/etcetera.
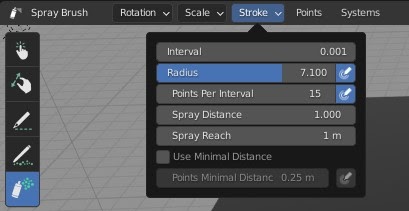
Header's Options
Active tool options are located in 3d viewport header. They are arranged in popup menus. For example, Spray brush has three menus.
Rotation and Scale menus will define how the newly created instances are rotated and scaled. The third menu, Stroke, is for direct brush behavior, such as brush radius, how many points are created per interval action, if point count is driven by pressure, and so on.
Gesture Gizmo
Just like native Blender, each brush has its own gesture gizmos that are called with the help of shortcuts, these brushes are adjusted with visual 'gizmo' feedback as well.
For example, most brushes have their Radius adjustable by pressing the F key, moving the mouse cursor will change the radius value, and releasing the F key confirms the new radius.
All available gesture shortcuts are written in lower-left corner of the viewport for convenience.

Shortcuts
Each brush can be called with keyboard shortcuts that can be customized in the addon preference. Please check out the addon preference to overview the various shortcuts at your disposal.
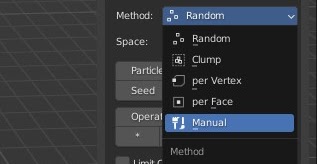
Distribution Brushes
Brushes that add new points
Dot Brush
Create a single instance per LMB. Instance initial rotation and scale can be set in header menus. Useful for adding specific instances in specific places.
Pose Brush
Create a single instance interactively, LMB to set instance location, then drag while holding LMB in the direction where you want instance +Y axis to be pointing to, while the distance from the initial mouse location sets the instance scale.
Path Brush
Creates instances along mouse trail at given a distance interval. Extra options in the rotation menu can force instance Y alignment to mouse direction.
Chain Brush
the chain brush is similar to the path brush with the specificity that it will always guarantee an alignment with the last created point.
Line Brush
The line brush will distribute instances at regular interface along a line. A divergence option will be available to randomize the spread along the line.
Spatter Brush
Similar to the path brush, with an added randomness offset per stroke.
Spray Brush
This brush behaves like a real aerial spray, the nozzle is represented by the cross cursor, spraying instances into the radius area.
Spray Align Brush
The Align Spray brush is a variation of the spray brush, with the added specificity of aligning your instances toward the stroke direction.
Lasso Fill Brush
The lasso fill brush is useful to distribute a chosen density of instances inside the drawn area.
Clone Brush
With the clone brush, you'll first need to sample an area with the sample shortcut, then each click will copy the points locations/rotations/scales and instancing IDs to the locations of your brushstrokes. Note that this brush will work best if you are using manual mode instancing ID.
Eraser Brushes
Brushes that remove points
Eraser Brush
Removes instances inside brush radius at a given probability rate.
Dilute Brush
Removes instances inside the brush radius at a given probability rate, until reaching a minimal distance between points.
Lasso Eraser Brush
Removes instances inside the area radius of a drawn lasso.
Translation Brushes
Brushes that change the location of instances
Surface Move Brush
The surface move brush alters instances locations. On LMB it grabs instances within the chosen radius and moves them along your surface(s) at a new location. The normal adjustment can be turned off if needed.
Surface Rotate
The surface move brush also has an extra ability: Use the MOUSE_WHEEL to rotate the positions of instances inside the brush radius.
Surface Scale
Additionally, with the surface move brush, you can use the CTRL+MOUSE_WHEEL to rescale the positions of instances inside the brush radius.
Free Move Brush
Freely move the points inside your brush radius in 3D space. Note that the points will be disconnected to their surface(s) and might become unreachable by some brushes.
Drop Down Brush
Drop down detached points to the surface(s) below.
Manipulator
Translate/Rotate/Rescale the selected point. First select the object to manipulate, then use the shortcut to swap to your regular transform gizmo.
Attract Brush
The attract brush will attract or repulse your distribution depending if you are using the CTRL shortcut while clicking.
Push Brush
The push brush will push your instances along your surface depending on your stroke direction. If you hold CTRL while clicking, the brush will use a straight line shape to push your instances around instead of a circle.
Split Brush
The split brush is ideal for creating a path in your distribution as it will push your instances to the brush stroke sides. If you hold CTRL it will do the opposite.
Turbulence Brush
The turbulence brush will randomly move your instances along their surfaces.
Relax Brush
The relax brush will smooth the position of the points creating a more uniform looking distribution with equally distance neighbors.
Rotation Brushes
Brushes that alter/set the default rotation attributes of points
Normal Alignment Brush
Will align the instance Z axis toward the direction of your brush. This brush is working in 2d screen space, therefore all instances under the cursor will be affected.
Tangent Alignment Brush
Will align the instance Y axis toward the direction of your brush. This brush works in 2d screen space, therefore all instances under the cursor will be affected.
Rotation Settings Brush
This brush will set rotation properties to instances within a given radius. It may come in handy when resetting instances rotation back to precise values is needed.
Note that it is possible to quickly apply the settings of this brush to all points in the points menu.
Random Rotation Brush
Add a randomized tilt to your instances within the brush radius in a continuous and uniform way.
Spin Brush
The 'Spin' Brush will slowly spin instances around the chosen Z axis.
Scale Brushes
Brushes that alter/set the default scale attributes of points
Scale Settings Brush
This brush will set scale properties to instances within the given radius. It may come in handy when resetting rotation back to precise values is needed, or to add a random scale.
Note that it is possible to quickly apply the settings of this brush to all points in the point menu.
Grow/Shrink Brush
Scales instances within a given radius at a defined increment. You can add (grow) or subtract (shrink) instances scale. Hold CTRL to switch from add/subtract mode.
Instancing Brushes
Brushes that assign instances to points
Instance Index Brush
Re-assign instances to their scattered points based on the selected instances of the list in the instancing control popover menu (located in the topleft header). Note that this brush is only useful when the instancing method is set to "Manual Indexing" in the Tweak > Instancing panel.
Header Options
the header of manual mode had a few handy options!
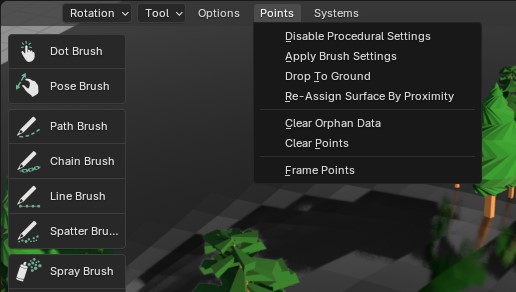
Header Options
There are important options available in the manual mode header:
-
Pop-up menus are available on each brush for tweaking their behavior settings.
-
In the points submenu you are able to:
-
Apply brush settings (for example, to apply a default scale/rotation to all points).
-
Disable all procedural settings (in case some procedural scale/rotation settings might be interacting with the default rotation/scale of your points for example.)
-
Re-assign/drop points to their surfaces (in case if your surface(s) mesh(es) have been edited, please run this operator to refresh the positions of the points)
-
Clear all distributed points (will remove all created points).
-
-
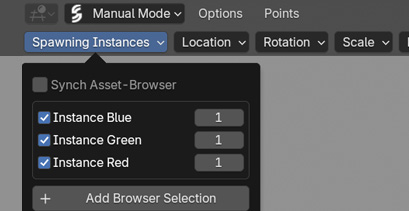
In the Systems header menu, you are able to quickly swap between existing manual scatters or add a new manual system with instances from your asset browser.
Instancing Controls
When the instancing method in Tweak > Instancing is set to Manual Indexing you'll be able to take full control of which instances are assigned when painting.
-
Enabling Toggle Enable or prevent the instance of being spawned when painting.
-
Probability Rate Decide the probability of an instance being spawned when painting, the higher the probability the more likely the instance will be spawned.
-
Sync AssetBrowser Synchronize the selected assets from your blender asset browser as instances in your instancing list. Everything will be imported and enabled automatically. This option makes for a highly efficient workflow when you're working with a lot of assets.
Auto-Detection
Don't worry if you forget to set the instancing method to Manual Indexing! It shall be set by default. If not, When you're in manual mode, Geo-Scatter will automatically detect if the instancing method needs to be changed and will display a helpful icon that allows you to switch to Manual Indexing with a single click.
Asset Browser Selection
As explained right above, when choosing the manual indexing instancing method and when toggling on the Sync AssetBrowser option, the selected assets from your blender asset browser will be imported and used automatically on each brush strokes. This will create a very fun and efficient painting experience assuming you have nice librairies to work with.
Convert Operation
Bring your regular scatter to manual mode
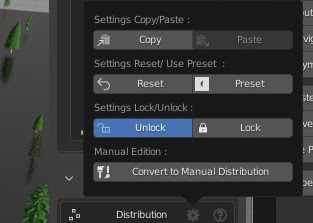
Convert Operation
In the distribution header menu (gearwheel icon), there is an operator available to convert
your procedurally generated points to manual mode. This operator is
semi-destructive, as it will turn off most procedural features ( you can
return to procedural distribution mode and turn them on afterward if
needed ).
Manual mode can handle smoothly up to 50.000 points depending on your
computer, so do not try to convert more than 500k instances, it is not
designed for such workload. It also does not make sense to destructively
control such a large number of elements, perhaps you are looking for a
specific procedural feature, more adequate to your situation?
CSV to Manual Scatter
Import scatter data from CSV files to create manual distributions
Import CSV Operation
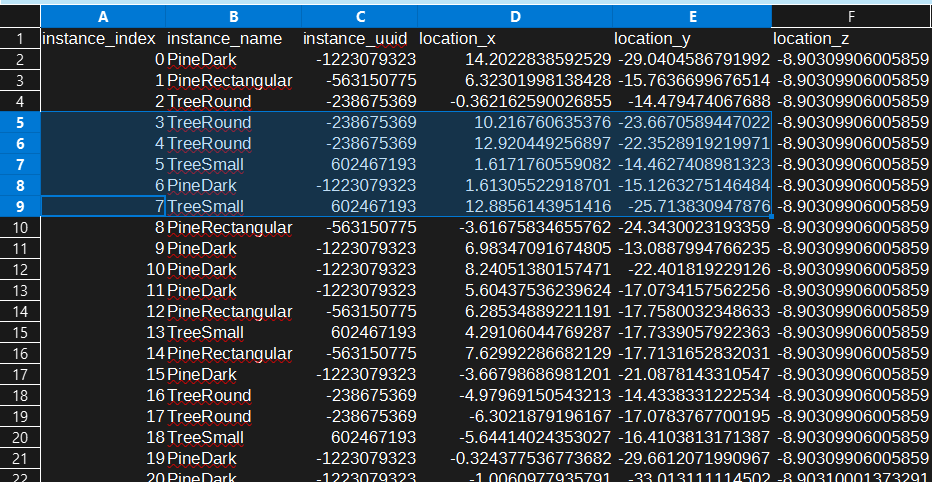
The Import CSV operator allows you to create or update a manual scatter-systems using data from CSV files.
The operator is located in Geo-Scatter Npanel > Tweak > Distribution > header menu (Gearwheel), only for manual distribution scatter-systems.
The CSV file must contain specific columns with transform data and instance names. All referenced objects must exist in your Blender scene before importing. The operator can create new scatter-systems or add/replace data in existing manual distributions.
Required CSV Format
Your CSV file must include these columns (case-insensitive, spaces/underscores ignored):
- Instance Name: "instancename", "name", "object", or "objectname"
- Location: "locationx/y/z" or "locx/y/z"
- Rotation: "rotationeulerx/y/z", "rotationx/y/z", or "rotx/y/z"
- Scale: "scalex/y/z" or "scax/y/z"
Do Not Remove/Replace Your Surface Objects
A common cause of broken manual scatters
Warning
Each manually scattered point holds a direct reference to the surface object it was painted onto. If that object is removed, replaced, or has its identity altered in any way, the points lose their anchor — and your entire scatter will collapse to the world origin (0, 0, 0).
Common ways the link gets accidentally broken:
-
Deleting the surface object and re-appending or re-importing a visually identical one. Blender treats the new object as a different datablock, even when the name matches.
-
Merging the surface object into another mesh via Ctrl+J, which dissolves the original object entirely.
-
Swapping the surface for a different object from elsewhere in the scene, or replacing it via the outliner.
-
Renaming the surface object, which can break the reference when the file is saved and reopened.
Please treat the surface object as a fixed anchor for the lifetime of your manual scatter. Editing its mesh is perfectly fine — just run the Re-assign/drop points to their surfaces operator from the header points menu afterward to refresh point positions.
Mixing Manual With Procedural
Manual distributions are compatible with the regular features
Example: Mixing manual points with the procedural random scale feature.
Example: A procedural grass distribution with affinities set to our manually distributed trees.
Mixing Manual & Procedural
Because the manually created points uses the same pipeline of the procedural distribution workflow, all procedural features can be also used for scatter-systems using manual mode.
Warnings
Be aware that mixing manual with procedural effects is a double-edged sword, as it can become quite confusing quickly; having a procedural effect enabled while not realizing it might lead to a frustrating experience! If you'd want to disable all procedural effects quickly there is an operator for that purpose located in the Header points menu.